Just Enough SQL to Begin

Motivation
I recently found myself helping out a few of my friends learn SQL. Everyone's first question is what should I learn? As I disagree with most of the top searches, I decided to throw my hat into the ring, and provide more than some and much less than other resources. Because of this, this guide is not an all-encompassing encyclopedia. It's meant to quickly get you up to speed and can be used as a quick refresher.
Another thing I hated about learning SQL is the lack of a testing environment. It's easy to learn how to use SQL but to practice it and get proficient at it is a whole other beast. To tackle this, in the last chapter, I provide you with a finished project that will create a testing environment for you and give you some exercises for you to practice.
Let's learn a bit of SQL real quick
Imagine you are working at a bookstore. You have to figure out how to keep track of all your books. Customers are constantly asking you 'Do you have this book', 'Do you have any books written by this author'. How would you handle this? You could write all the books you have in a notebook, with some information describing the books, like what is the book's name, how many pages it has, what genre is it, who wrote it and so on. But soon it becomes a hassle to swipe through the pages to find what you are looking for. You could also use some tools for this, like a simple text file or excel. But in all of these cases, you are using the same method to represent a book. You are using a bunch of relevant attributes that represent the book. And in excel, you would be representing your book collection as a table and each row as a book.
The same concept is used in relational databases. You represent the entity by its attributes, so you break a book down into a set of attributes, and then use those attributes as the columns of a table. Each row, a set of values of attributes, would then form a book.
Here is what I mean, here's the table schema:
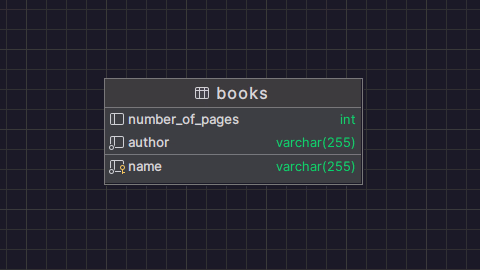
and an example of the table's contents:
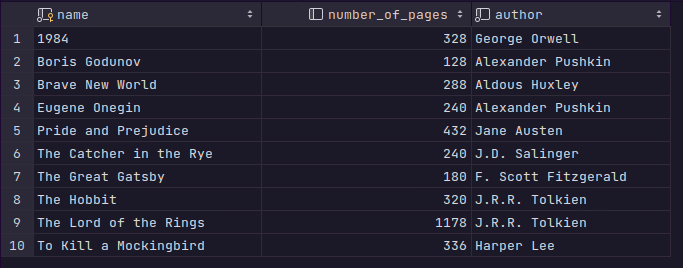
Alright, cool. Now we have a table, it's filled with information about the books, but how do you retrieve the information about your book collection? This is the main part about databases, you just fetch the information you need.
Basic Syntax
To do that, you use SQL. You write down a query, and here is an example of the most simple one:
SELECT name
FROM books;
And here is what the query will give you:
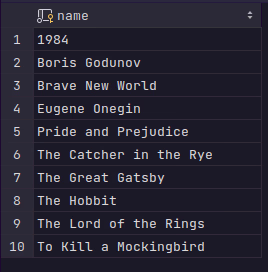
The result is again, a table! Our query asks for a list of all the names from the books table, and it returns a table with a single column that contains the names.
Let's break it down. First, you have to specify where you are retrieving the information from, as in which table are you going to look in.
This is done by the FROM keyword. With FROM you specify from which table you are retrieving the documents.
But what information for each book do you need? Well to get this you use the SELECT keyword. SELECT allows you to specify which columns(attributes) you are retrieving.
In our example above it is clear that we want to get the list of names of all the books in our store. But what if I need more than the name? Let's say I also want to get information about who wrote the book. Well, we could simply stack columns one after another:
SELECT name, author
FROM books;
But this becomes a hassle to do if we need all the attributes, the whole set that composes a book. Thankfully, we are given a shortcut for that, instead of having to type the name of each attribute:
SELECT *
FROM books;
The * symbol in the SELECT statement simply means: give me all the columns.
This is all handy, but so far we have been getting all the books we have, which again, might not be what we might need. A realistic case is to have a customer ask you which books you have by Alexandar Pushkin.
This is where the WHERE keyword comes in:
SELECT name
FROM books
WHERE author = 'Alexandar Pushkin';

The WHERE keyword specifies a condition for the books you are about to retrieve. Here, we are specifying that we only want to get the books where the author is Alexandar Pushking, by using the = operator in the condition.
Besides the equality operator, you can also use a few other conditional operators:
!=, >, <, >, <=, >=
You can also use more than one where condition by combining them with logic operators and and or:
SELECT name
FROM books
WHERE author = 'Alexandar Pushkin'
    and number_of_pages >= 300;
When using the equality operator, it is not enough that you partially get the name right. What if you forget the first name of the author?
SELECT name, author
FROM books
WHERE author LIKE '%Pushkin'
The keyword LIKE does exactly that, it allows us to partially match the values. We do this by using the % sign. It's a placeholder meaning anything. In our example, it means anything, ending in Pushkin.
You can also use it after something, like in Alexander%, to get Alexander followed by anything.
And you can combine it as %xandar% to get anything before 'xandar', followed by 'xandar', followed by anything.
Aggregation
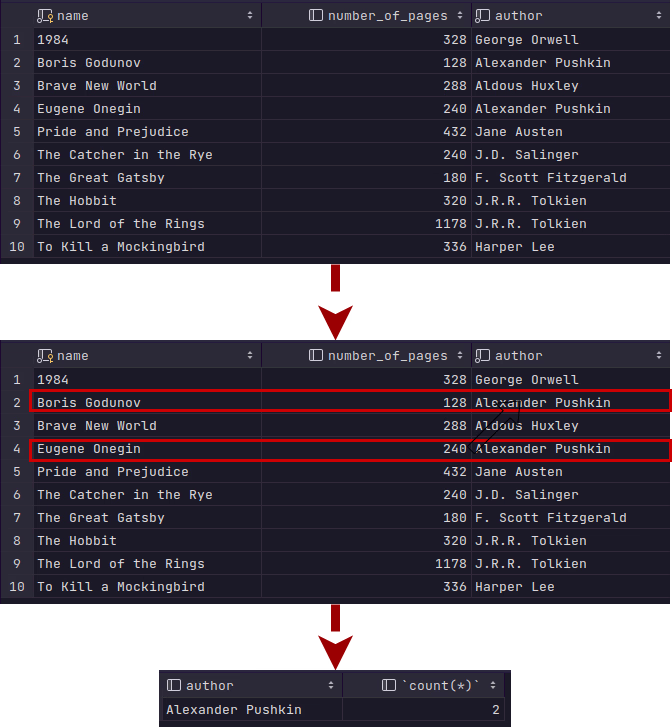
But how do you see how many book titles you have for Pushkin? Well, you can use the aggregation operator:
SELECT count(*)
FROM books
WHERE author = 'Alexandar Pushkin';
count() is an SQL function that counts the rows of the table you received. Remember, the result is always a table, so all you are doing is simply counting the number of rows.
Aggregation functions operate on the table you received. Here are a few examples:
count(*)counts the number of rowsmax(columnName)returns the maximum value for a columnmin(columnName)returns the minimum value for a columnsum(columnName)returns the sum of values for a columnavg(columnName)returns the average of values for a column
But how can you retrieve the number of books for each author from your collection? While you could run the query above multiple times for every author but that would be impractical. Instead, you could utilize the GROUP BY keywords.
SELECT author, count(*)
FROM books
GROUP BY author;
GROUP BY breaks the table into multiple tables, by grouping rows from the table by the values from the column or columns provided after the keyword.
In our example, it would break down our table into a table per author. And in each of those tables, all the books would be written by that specific author. After you break the table into multiple tables, you can select the rows that you are grouping by, or that are dependent on the group by columns.
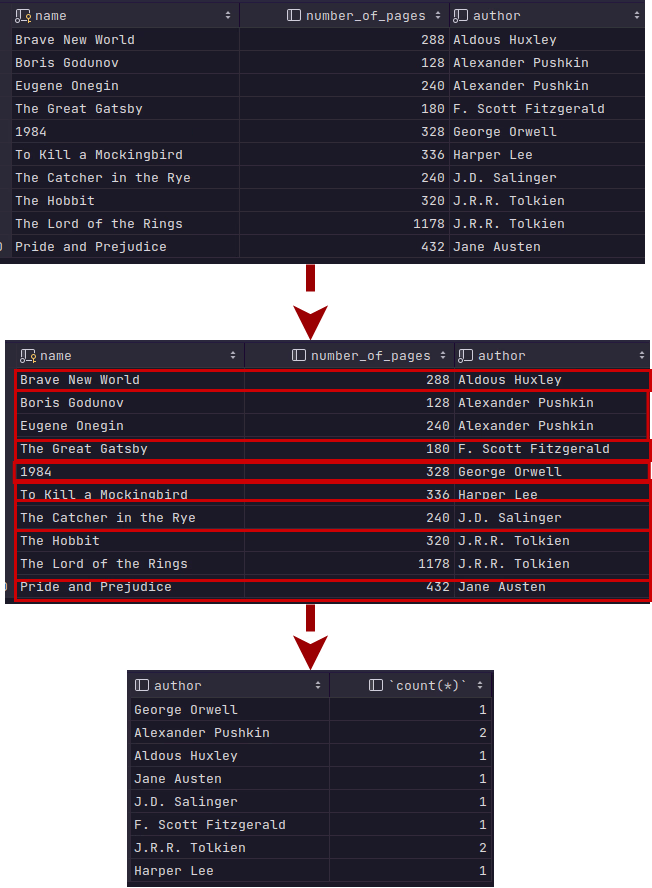
Remember, a result of a query is always a table. After you split the table into multiple tables, you would have to merge them back into a single table. In our query above, we are counting the number of each table's rows, and returning the author's name, and the number of rows as the columns of the final table. Be careful here, only the columns that are used by the group by keyword or functions can be the columns of the final table.
You can apply conditions in both steps of the query before you break the table into multiple tables and after you do. If you want to filter out any books that aren't larger than 100 pages you would select it like this:
SELECT author
FROM books
WHERE number_of_pages >= 100;
And then you could group the rows by the GROUP BY keywords
SELECT author, count(*)
FROM books
WHERE number_of_pages >= 100
GROUP BY author;
And to apply a condition after you grouped up the rows, you can use the keyword HAVING. It applies a condition to each of the mini tables you create after breaking the main table into multiple tables:
SELECT author, count(*)
FROM books
WHERE number_of_pages >= 100
GROUP BY author
HAVING count(*) >= 2;
Here we are checking in each of the mini tables that belong to a specific author if the table contains more than 5 rows.

Multiple Tables
So far we have kept only the name of the author in the row. Let's say you are now in need of also saving the author's birthday. We can update the table to contain that information, that attribute. If we do this, we get:
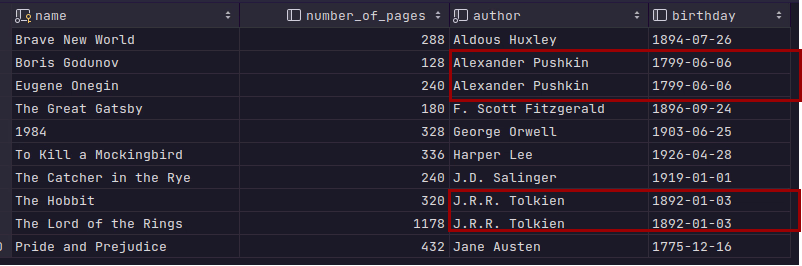
You can see that we are duplicating information in each of these rows. What if we needed more information about the author? This would mean more columns that are duplicated in each row for that author's books. This means that if we realized something was wrong, we would have to go through each one and correct it.
To avoid this repetition and multiple updates, we can simply split the author portion of the data from the books table, and create a separate author table.
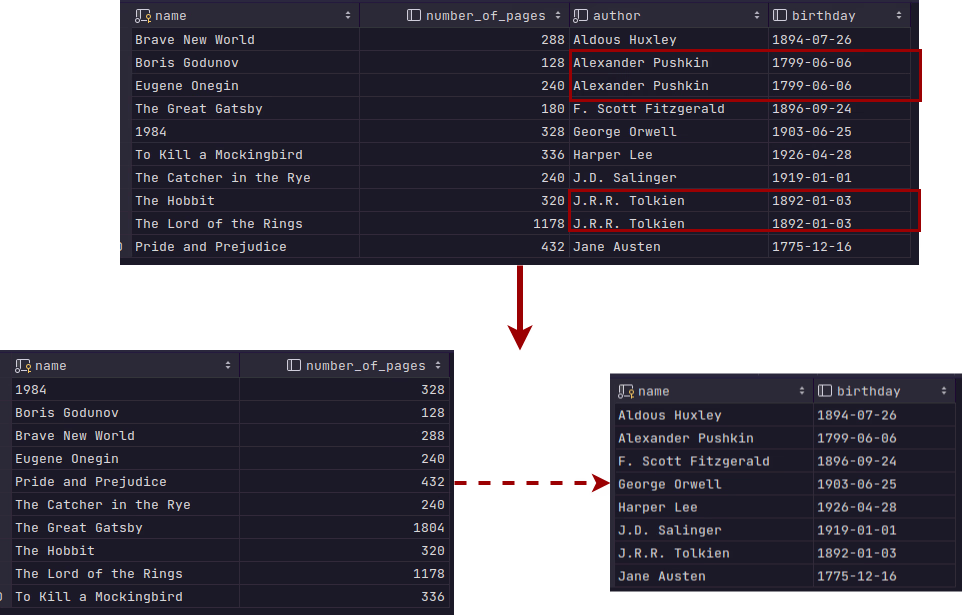
This is how we avoid all of those update issues. Now we simply have a single author, and connect him to each of his books! This way we only have to update a specific row for an author.
This connection between tables is called a relation, and we have a lot of different types of relations.
We have a one-to-one, where an entity from a single table is connected to only a single entity from another table. An example of this could be a person and a passport. A person can have only one passport, and that passport can only belong to them.
In contrast, we can also have a many-to-many relation in which one or more rows belong to one or more rows from another table. Think of a student and classes at a university. A student can take multiple classes, but there are also a lot more students taking those classes.
We also have one-to-many and many-to-one relations. This is where a single row can have multiple rows connected to it, but the reverse doesn't stand. An author can write many books, but a book can not be written by more than a single author (at least in this article).
We will be using the one-to-many relationship between the author and the books. But how is this relation implemented? First, we need a unique identifier for each row. For the authors, we could use their names and get away with it without too many issues in general, but in practice, you use an incrementing number called an identifier(ID). This unique value is called a primary key. It has to be unique for every row.
Now that we have each author uniquely identified by their primary key, in the books table we simply add the identifier from the author's table. As this is a primary key from another table, in this table it will be called a foreign key.
And now, when we want each book written by Pushkin we can do
SELECT *
FROM books
WHERE author_id = 13
But just showing the identifier is not that useful, we want the attributes, the name, not the identifier on its own! To fix that, we can select from multiple tables:
SELECT *
FROM books, authors
WHERE author_id = 13 and author_id = authors.id;
In the previous example, the books table has a column named author_id, but we are also using the column authors.id. This dot is used to specify from which table we are using the column, as we can have the column named id in both the books and authors table. So to avoid name conflicts and confusion, we use the format:
table. column
to specify the table and its column.
Here's an example of how we can use it to select just a few columns from both tables:
SELECT books.name, authors.name
FROM books, authors;
Sometimes, querying like we have been doing so far is not enough. Here's an example. How would you find the books which have more pages than the average book from your collection? We have two problems here, we have to find the average number of pages. We can do this pretty easily like this:
SELECT avg(number_of_pages)
FROM BOOKS;
Let's say that the result we got is 313. We would then have to type the result of this query into another query like:
SELECT *
FROM books
WHERE number_of_pages > 313
This means that whenever we add another book, we would have to recalculate the average number of pages, and remember that number for the second query. Its really impractical, and because of this we have the ability to nest these querries into each other like:
SELECT *
FROM books
WHERE number_of_pages > (
        SELECT avg(number_of_pages)
        FROM books
)
This way, we calculate the average number of books on the fly, instead of having to do it manually as a two-step process.
Let's create and maintain a database
There are a few operations that you need to know to be able to get the database up and running.
The first one is to simply create a database for our bookstore, it will contain all the tables for our bookstore:
CREATE DATABASE book_store;
After we do that we can connect to our database using the keyword
USE book_store
And now we can create our tables:
CREATE TABLE authors(
    id INT NOT NULL AUTO_INCREMENT PRIMARY KEY,
    name VARCHAR(255) NOT NULL,
    birthday DATE
)

CREATE TABLE books (
  id INT NOT NULL AUTO_INCREMENT PRIMARY KEY,
  name VARCHAR(255) NOT NULL,
  number_of_pages INT,
  price DECIMAL(10,2) NOT NULL,
  author_id INT NOT NULL,
  FOREIGN KEY (author_id) REFERENCES authors(id)
);
Here we create two tables, the way we do this is pretty simple, we just list out the attribute names and some of their properties.
Each attribute needs to have its datatype specified, it just explains to our database what our column is supposed to be represented with
- INT - Stores integer values like whole numbers.
- VARCHAR - Stores multiple characters up to the limit provided in the brackets, meaning that in our name columns, we can store names up to 255 characters
- DECIMAL- Stores fixed-point decimal numbers. The first value in the brackets specifies its scope, the total number of digits with the digits after the decimal point included, and the second number in the brackets provides us with the number of digits behind the decimal point
- DATE - Stores a date in the YYYY-MM-DD format
Besides this, for each attribute, we can specify that it is mandatory. To do this we use NOT NULL keywords, meaning that that attribute can not be left empty.
We also need to define the primary key, we do that by just using the keywords PRIMARY KEY in the appropriate attributes definition. And we need to specify the foreign keys, which column contains the foreign key and what is it referring to. The column's foreign key attributes type must match the primary key type of the other table.
Let's add our first author:
INSERT INTO authors(name, birthday)
VALUES ('Alexander Pushkin', '1799-06-06');
In the insert statement, we specify into which table we are inserting the values. The brackets contain the names of the columns. The values from the VALUES keyword represent the values for the columns for the row we are inserting. Note how we are not adding the id, even though it's mandatory. We can do this because we specified the id column to be AUTO_INCREMENTING
And now let's add a single book:
INSERT INTO books (name, number_of_pages, price, author_id)
VALUES ('Boris Godunov', 128, 9.99, 1);
Now we can also update the column values of our rows. Let's increase the price of the Boris Godunov book we added:
UPDATE books
SET price = 15.99
WHERE id = 1;
We can see that the syntax is fairly similar to how the querying works. We specify the action, UPDATE in which table, we then SET the value of the column, for the rows in which the WHERE condition is satisfied.
And finally, let's delete this book:
DELETE FROM books
WHERE id = 1;
Let's practice SQL
As I mentioned before, reading about how to write queries is much different from writing them. It takes some practice to wrap your head around this.
The best way to practice is, to well, write queries. The usual problem is, you usually don't have a database ready to go to test your queries out.
To help out with this, I created a small project, that will install a database engine for you and populate the database with data for you.
Here's the link to the project: https://github.com/MatijaBojanic/learn-sql
There you will find the instructions on how to install the project locally as well as the exercises that are tailored to the database.
Glad you made it here, I hope I made some of your lives easier.